
If you’d like to automatically transmit response data and results from your OOOPEN Lab quizzes or interactive projects back to your internal systems—such as your website, CRM, or Google Sheets—you can now easily achieve this using the Webhook feature with an API Key.
Whether you’re aiming to automatically categorize potential leads or streamline data processing,this guide will show you how to set up Webhooks step by step, explain the types of data that can be returned, the trigger points, and practical applications, helping you extend the impact of your interactive projects to more scenarios.
Table of Contents
- How do I enable Webhooks? Are there data examples?
- What data fields are included?
- What data cannot be returned?
- Recommended security mechanism
How do I enable Webhook? Are there data examples?
- Become a paid user to access this feature during the active period of your subscription. (How to choose a plan?)
- Go to the “Player Profile” page and enter the “Developers.”
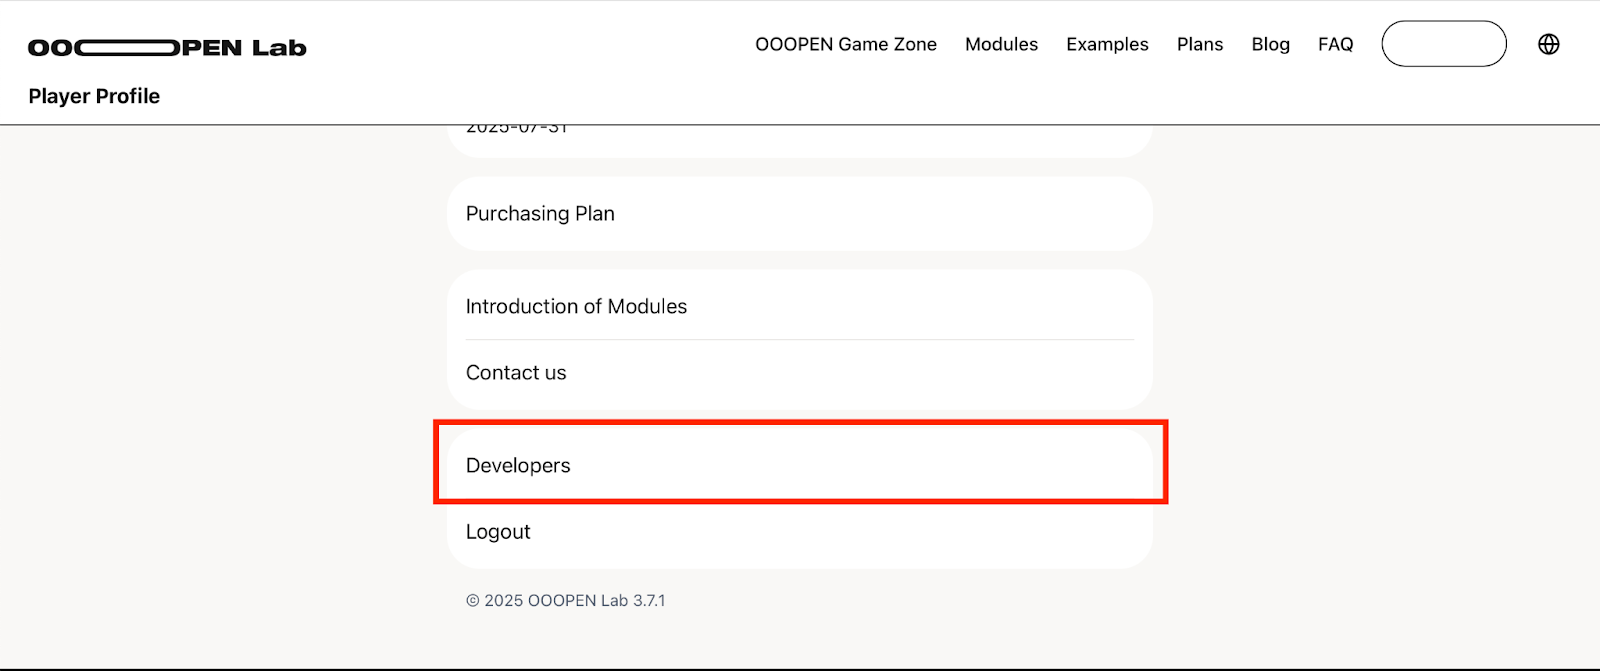
- If it’s your first time entering the Developers, generate a new API Key.
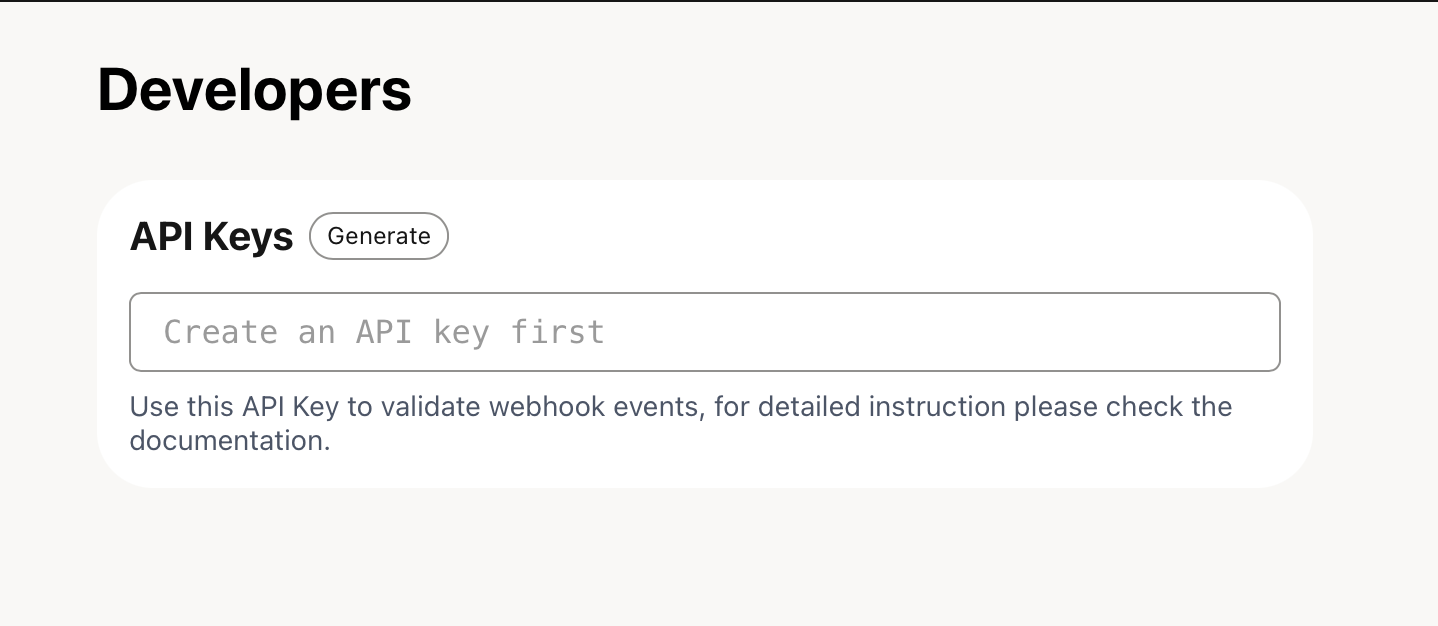
- Once the API Key is generated, you can begin setting up Webhook events.

- Webhooks can be triggered at two points—choose based on your needs:
- Activate “Started” Event: When a player enters the question page.
- Activate “Completed” Event: When a player finishes and reaches the result page. (Definition of completion)

- Once successfully set up, a POST request will be sent to your designated URL whenever trigger conditions are met.
Sample JSON Payload
{
  "data": {
    "answerId": "o1VepeqjgSbe6XxeJlZs",
    "quizId": "nvCwKZUvGw43KTrMth3V",
    "startedAt": "2024-04-11T08:44:10.782Z",
    "ref": {
      "id": "gI11io",
      "label": "Channel Name"
    },
    "utm": {
      "campaign": "",
      "id": "",
      "source": ""
    },
    "fromQuiz": {
      "answerId": "",
      "quizId": ""
    },
    "finishedAt": "2024-04-11T08:44:10.943Z",
    "result": {
      "id": "default",
      "label": "Result Name"
    },
    "duration": 2513,
    "answers": [
      {
        "id": "VvsB5w",
        "duration": 1297,
        "value": "adaff",
        "title": "Question 1"
      },
      {
        "id": "WSgpX9",
        "duration": 1217,
        "value": "Other",
        "other": "User's custom response",
        "title": "Question 3"
      }
    ]
  },
  "type": "finish",
  "timestamp": "2024-04-11T08:50:57.315Z"
}
What data fields are included?
General response data fields:
| data | Quiz response data (detailed below) |
| type | Event type (“start” or “finish”) |
| timestamp | ISO 8601 timestamp |
Shared data fields for all event types:
| answerId | Unique response ID |
| quizId | Quiz ID |
| startedAt | Start time of the quiz |
| ref | Channel source (detailed below) |
| utm | UTM tracking data (detailed below) |
| fromQuiz | Other module source (detailed below) |
Fields specific to “quiz completed” events:
| finishedAt | finishedAt: Completion time (ISO format) |
| result | Quiz result |
| duration | Total time spent (in milliseconds) |
| answers | Array of individual answers |
Fields for answers:
| id | Question ID |
| duration | Time spent answering (ms) |
| value | Selected answer |
| other | Custom user-entered response |
| title | Question title |
Fields for ref (channel source):
| id | IDChannel URL ID |
| label | Channel label configured in backend |
Fields for utm (requires advanced feature “Export UTM Data”):
| campaign | utm_campaign |
| id | utm_id |
| source | utm_source |
Fields for fromQuiz (requires advanced feature “Link Other Modules on Result Page”):
| answerId | Source answer ID |
| quizId | Source quiz ID |
What data cannot be returned?
Because triggers are limited to “started” and “completed” events, data submitted after quiz completion, such as responses from optional forms, lead collection fields, or leaderboard scores from scoring-type quizzes—cannot be transmitted via Webhook.
Recommended Security Mechanism
Webhook transmissions include an x-ooopenlab-signature header, which can be used to verify that the notification originated from OOOPEN Lab.
Verification Steps:
- Convert the data object (only the data JSON part, not the whole payload) to a JSON string. Use your API Key with the HMAC-SHA256 algorithm to generate a hex digest.
- If this hex value matches the x-ooopenlab-signature header, the data is verified.
Example
If the data is {“test”:123} and the API Key is abcdef0123, the resulting hex signature would be: c6dddde7ffbf0c651277f40b52cc8a07d80493982eaa6a10b7ab30bd6d9d4fe7
Sample Code (Node.js)
const crypto = require('crypto');

const key = 'abcdef0123';

const data = '{"test":123}';

const signature = crypto

  .createHmac("sha256", key)

  .update(data)

  .digest("hex");

// signature === 'c6dddde7ffbf0c651277f40b52cc8a07d80493982eaa6a10b7ab30bd6d9d4fe7'
Now register as a Creator and start building with the free trial right away!
Simply click “Login/Register” at the top right to become a Creator. With the free plan, you can create, edit, and publish unlimited projects with no time limit!
The free plan currently offers unlimited trial use with some feature restrictions. You can view details in the backend under “Purchase Plan > Click to Expand Full Feature Comparison Table.” Before officially publishing, simply purchase a plan online to instantly activate your account and unlock publishing permissions within 1 minute!
Leave a Reply